Bow jewelry

Lately, I was really enjoying making my own jewelry. I like any kind of chain jewelry, rings, bracelets and many more. I've tried to make this bow design out of regular clay and it was a pain in the a**. Fortunately, I "discovered" art store and modelling clay.


For this jewelry design I had in mind some pastel colors, so I picked peach and mint modelling clay. Each was around 1,60€. In my opinion it's very cheap, since you can make a lot out of it.


Bow design

To make a bow I took a small peace of clay and rolled it into a ball. Then I rolled it into cylinder. I can't find a better word for this shape. But you know what I mean - a long stick. Each end I thinned out a bit, so that it won't stick out in the back. Then I used a glass jar to roll over and flatten it.


Then I rolled each end together. I turned the model around and with a knife draw on two lines to represent the crease of the bow. After that I just squeezed the model in the middle.


I took another small peace of clay, rolled it into a ball, then a stick and flattened it. I rolled it over the middle part of the bow. And that is it. Then all I did was baked it in the oven as it was instructed on the clay.


Really simple design and easy to make. After that I played around with the clay. Created some multicolor bows and some other things. You can see below, that I went a bit overboard. When I start something I just can't stop :). It was so much fun doing it. Just a small advice long nails and clay - not the best match. Make sure that you won't stick your nails into designs.


When my designs cooled down I went on to decorating them. I used nail polishes to create glitter on bows and made them shiny with clear top coat. I added chains, studs, beads and many more.


I incorporated bow designs into making bow bracelets, bow rings, bow key chain and bow necklace.  Wow...what didn't I do? Oh yeah, earrings: )).

Bow bracelets


Bow rings


Bow key chain


Bow necklace

I also did a fox ring, because I once saw some in the stores and really wished it, but it was way too expensive. So, I did my own inspired one :).


Have you ever tried making your own jewelry? Would you wear any of my designs?


Versatile Baby Powder

Here are some tips on how to use baby powder. Maybe you've heard some, maybe you haven't. I never knew how versatile baby powder can be. And the fact that is cheap and you get a lot of the product is just a bonus :).


Baby powder for mat skin

You can use baby powder as a translucent powder to mattify the skin. I tried and it works. It's white like most loose translucent powders and once it's on the skin it disappears.

Here's my big greasy forehead to prove it :)

And here I used baby powder to mattify it


 I have a very light skin color, so on me it didn't look white at all. Don't know if this would work on very dark skins, though. In case you ran out of your favorite powder, use baby powder. You get a lot more product for a lot cheaper price and it does the work. Baby powder is essentially made to absorb moisture. As far as I tried it, it absorbs my grease on the face just as well :).

Baby powder for greasy hair (roots)

My hair roots get really greasy, but my ends are very dry. When I want to save them from washing for at least another day, I just use baby powder on my root. It absorbs the grease and my hair at least looks a bit fresher. Now, this is good for light shades of hair. If you have darker hair, the powder would make your roots look like  you may be having some gray hair problems :). It will leave a white fallout on the hair-so not recommended. Then again, some dry shampoos also leave this white stain on the hair.


Good thing is to brush the hair before using it, put some powder on, really massage it into the roots and then lightly brush away at least some of the excess. It's again a lot cheaper than dry shampoo and you can have it in your bag and use it at least when you don't have dry shampoo with you. 

Baby powder for some serious volume

If you tried to make your whole head feel fresher with baby powder (read previous step), then you might have realized that it gives your hair some serious volume! You know those volume powders that you can buy? I am almost disturbed by how much they look like just a regular baby powder. The price, however,  is definitely not the same as baby powder.


When you curl your hair, even if it's freshly washed, get some baby powder and put it towards the roots of your hair and I am certain it should give you some added volume. I know it did to me.


Obviously everyone is different. I just wanted to share some of my tricks with baby powder. Some may work for you, some may not. If you ever tried any, let me know. Also, let me know if you know any other ways of using it :)

Essence Guerilla Gardening

I was very interested in some of the products introduced by some other bloggers concerning the new Essence collection. When I saw this collection I wanted to try this fuchsia  color cream blush and their eyebrow mascara.


The blush is in color 01 Mission Flower. It's sort of a fuchsia color. The texture is supposed to be cream to powder blush and it is. I tried the blush on my finger and it is a cream texture, but as soon as you put in on your face it turns into powder. I was so surprised! How do they do that? I just can't get over that. On the finger it's still a cream, but on my cheeks is powder. :)


The color was also very interesting and it has some purple tone to it. So I wanted to try how it looks on me. It's pretty much pink, except it's not that rosey pink. The color is definitively not as intense as in the pot. Overall, I like it. The only thing that disturbed me was that it's pretty sheer. Cream blushes are usually very intense, but this one transforms into powder and it becomes sheer on the skin. You can build it up, though.


I never had color eyebrow mascara before. I only have transparent one to make the brows stay in place. I wanted to try this colorful if it actually gives color to your brows. I got the lightest color 01 Garden Girls. It's a light brown color. Well, it's probably not for the blondes, because it's pretty dark. 


The wand is different on each side. On one it's normal length hair, on the other side the hair is ascending from the shorter to the longest. You can use either side. One with the largest hair is great for brushing the hair to stand up. The shorter side is good for packing on the color. But be careful with applying. The wand doesn't distribute product evenly. You have to be careful not to get the product all around your brows and not actually between the brow hairs.


I don't like how it looks on its own. I like to make my brows the usual-use eyeshadows to fill them in and then put this mascara over that. Then it gives more color to the brows and it makes them look fuller. I am loving fuller brows! :) 

My natural brows

Brows only with mascara

Brows with eyeshadow and mascara

I don't think the brows will stay in place with that one, but they will have some additional color. So I recommend it for fuller looking brows. I love this product, because it makes my brows a lot fuller, since mine are naturally very sparse. I also hate the fact that the products isn't distributed evenly.

Have you tried any of the products from this collection and how do you like them?

Pattern nail design

I have tried this design before and wanted to share it on my blog. It is a design that makes your nails seem like they have pattern. I like to use this pattern design only on the center of the nails, so that it gives them a nice dimension.


For this I painted my nails light purple. I used Avon nailwear pro in Loving Lavender. The thing to remember is to let it dry COMPLETELY. If not, once you try putting the material on it will sink into the nail polish. You can totally do that if you want three dimensional nails, but I didn't go for that kind of look :)


Then I took a piece of material that is actually used for garden or as a net on the window pain for protection against bugs (I don't no the official name of the material). I cut it into small squares and wrapped it around my nail. When putting the material on, turn it so that your squares won't be horizontally on the nail. That way your pattern will be much nicer and not so uniformed. I also put some tape around, since it's hard to make that fabric stay in place. Believe me, you do not want it to move around, or your pattern won't be nice.


Then I used my dark blue/green Alessandro nail polish. Unfortunatley I couldn't find the name of the color. It is a blue/green color with multicolor shimmer in it. I thought it would be a nice contrast to the lavender base. With a sponge I dabbed on some of that nail polish and then gently removed the material.


The color won't stick on those places where there is material on. So after you finish you get this pattern in the center of the nail. Then I also applied my favorite top coat. For that step I also recommend waiting a little so that the pattern dries.


And this is the one I tried a while ago.


Do you like that sort of nail designs? Have you ever tried something similar?

Beyonce inspired natural look with smoldering eyes


On Wednesday I went to see The Mrs. Carter Show by Beyonce in Zagreb (Croatia). I was surprised by how natural looking make up she used on this tour. All the attention was on the clothes, dancing and light shows. But her make up was kept a vary natural throughout the whole show.


Since I liked her new Pepsi commercial (Pepsi was her sponsor for the tour), I wanted to try to do a look inspired by that commercial (which is also very similar to the one on her tour). In this commercial she has a very natural look, with sexy-smoldering-messy-smokey-eye make up. Ok, that was a lot of words :).

You can find that commercial here .

On the 
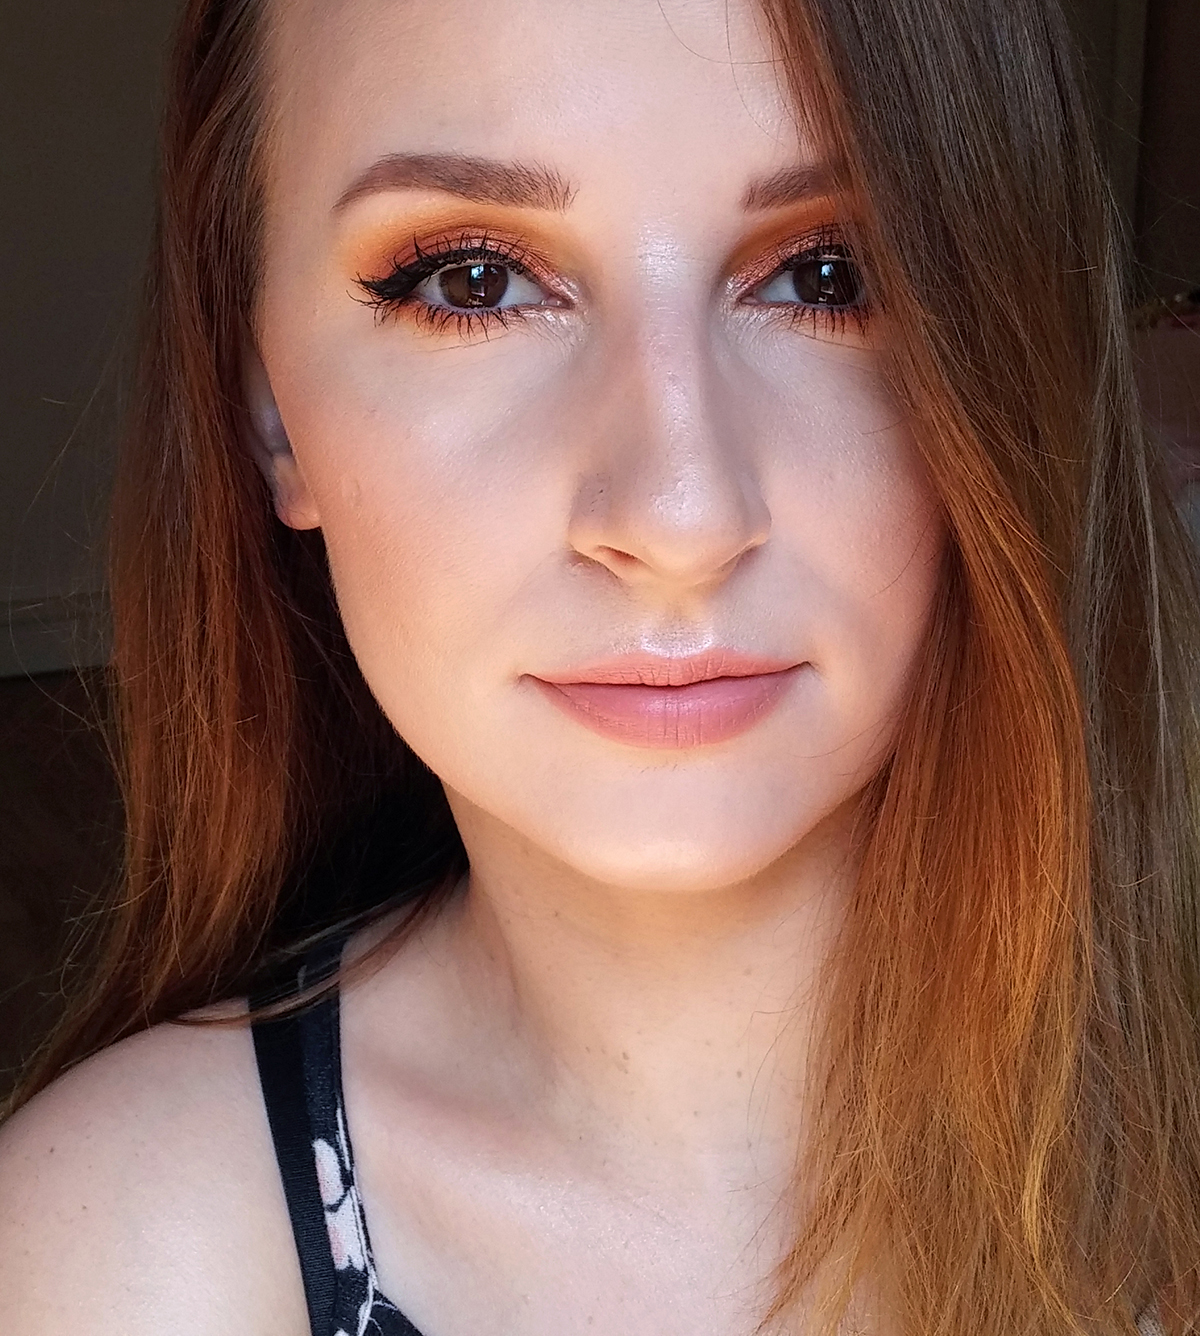
face I used my Revlon ColorStay foundation with a brush to evenly put it on the skin and really thin it out towards the edges of the face. Then I used a Bourjois Healthy Mix to pin-point conceal some red patches on my face and under the eyes. I didn't powder the face, because she has a very dewy look - she is supposed to be working out in the commercial, so of course the shin can't stay mat.


For the eyes I used my 88 shimmer palette by Coastal Scents. I used a brown color that has a silver undertone. Of course all the colors in this palette are shimmery. She had this grey-brownish color all over the lid. So I put the first color all over my lid, but kept the intensity of the eyeshadow only on the mobile part of the lid. I also put some under my eye. On the bottom you can go very heavy, even put the eyeshadow a bit lower than you would normally.


Then I chose a black shimmery color (because I don't have any mat one :) ) and put it very close to the lash line on the bottom part of the eye. I also put it very tight to the eyelashes on the top of the eye. This acts as a liner, but it makes the look a lot dofter, not as harsh as a liner would. You can also use a pencil and smudge it around the eye. The important thing is to smudge and blend the two colors together. Beyonce also tight lined her bottom and top water line. I didn't do that, because unfortunately my eyes are way to sensitive to put up with that.  On the inner corner I used one of the gold eyeshadow color from the same palette.


After that don't forget to curl the lashes. This is probably the thing that makes the most difference in any make up look. I applied my Bourjois Volume Glamour Max Definition mascara, but only on the top lashes. Since I have very long bottom lashes, I skipped applying mascara on them. I think that would ruin the previous work. The bottom part is heavy enough without the mascara.


For the brows I used a spoolie to brush them up and applied some mat brown eyeshadow. Beyonce also has some very natural looking brows. So I think the eyeshadow makes the look softer than eyebrow pencil.


I used my Catrice eyeshadow in 340 Ooops...Nude Did It Again as a highlighter on my cheekbones and a bit on the cheeks. I also used it on the bridge of my nose and my cupids bow on the lips. On the cheeks I used a blush by Deborah in 24 Rame. This is a bronzy-peach blush. I used it very very lightly, just to give some color.


On the lips I used a Loreal Color Riche Star Secrets lipstick in color 715 (or Jane Fonda) to give them some color. On top of that I used Maybelline Color Sensational lipstick in 605 Precious Beige to give them some shimmer and then I put on some of my highlighting color on the center of the top and bottom lip. This is a must have if you have small lips like me :) .